Thursday, 5 March 2009

Banana Butterscotch Pudding

Who doesn’t love a hearty pudding? I think puddings were made for chilly winter days but then again I could easily eat them come sunshine, rain or snow! I had 2 small ripe bananas left in the fruit bowl after making the muffins yesterday and I knew exactly where to put them to good use! I had the perfect recipe in mind and one I had remembered seeing in Rachel’s Favourite Food at Home (just loving this book). This recipe is originally from Bill Granger’s book, Simply Bill but features in Rachel’s book, as she adores this pudding and I can see why!! This self-saucing, all in one pudding is baked until the sponge has risen and set, while underneath is hiding a luscious sticky sauce. If you fancy something sweet, sticky and utterly yummy, you can’t go wrong with this pudding, especially served with good-quality vanilla ice cream.


Banana Butterscotch Pudding

Serves 4

Ingredients
For the pudding:
125g/4½ oz plain flour
3 level tsp baking powder
125g/4½ oz caster sugar
1 egg, beaten
1 banana, mashed
250ml/8fl oz milk
1 tsp vanilla extract
85g/3¼ oz butter, melted

For the topping:
100g/4oz soft brown sugar
2 tbsp golden syrup
150ml/5fl oz boiling water

To Serve:
Vanilla Ice cream or softly whipped cream

Preheat the oven to 180°C (350°F/Gas 4).
Sift the flour, salt, sugar, baking and powder into a bowl.
Add the mashed banana, milk, butter, egg and vanilla extract and whisk together until well combined.
Pour into a greased 1.25 litre baking dish.

To make the topping, place the brown sugar, golden syrup and water in a small pot and bring to a boil.
Pour the boiling mixture carefully over the pudding, then bake for 30-40 minutes or until cooked through when tested with a skewer.
Serve with vanilla ice cream.

Wednesday, 4 March 2009

Banana and Peanut Butter Muffins

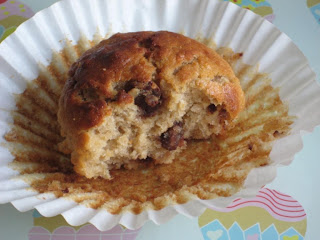
It seems since making the Toffee Apple and Almond Crumble recipe I’ve been unable to put down Rachel Allen’s Favourite Food at Home. There are so many great recipes in this book that I had forgotten about (that’s what happens when you own nearly 200 cookbooks, eek). I’m making it my mission during the month of March to try out recipes I have book-marked, but don’t quote me on that, he he! In our home we adore muffins and they make a great breakfast on the run, especially for teenage boys who deny they have time for brekkie in the morning (tomorrow Jake will have no excuse)! These muffins are deliciously moist, sweet and nutty and bursting with flavour. I couldn’t resist adding some Nestle Swirled Milk Chocolate and Peanut Butter Morsels for that extra scrumptious touch.

Top of the Muffin to ya!


Banana and Peanut Butter Muffins

Makes 12 (I ended up with 17)

Ingredients
275g/100oz plain flour
50g/2oz oats
1 tbsp baking powder
2 eggs
150g/5oz light brown sugar
2 bananas (200g/7oz), peeled and mashed
125g/4½ oz crunchy peanut butter
50g/2oz butter, melted
250ml/8fl oz milk
150g/5oz Nestle Swirled Milk Chocolate and Peanut Butter Morsels (optional)

Preheat the oven to 190oC/170oC fan oven/375oF/Gas mark 5. Line a muffin pan with 12 paper muffin cases.

Place the flour, oats and baking powder in a bowl, mix together and set aside. In another bowl, whisk the eggs; add the light brown sugar, mashed bananas, peanut butter and the melted butter. Stir to mix, then add the milk and stir to combine. Add the dry ingredients and fold in gently, do not over-mix.

Spoon the mixture into the prepared muffin cases and bake for 18-24 minutes, or until the tops spring back when gently touched. Allow to stand in the muffin pan for a minute before turning out to cool on a wire rack.

Tuesday, 3 March 2009

Wholemeal Shortbread Biscuits

Biscuits we all love them don’t we? I definitely do and what better accompaniment is there to a cup of tea, after all tea and biscuits go hand in hand! This morning I decided to stick to my promise of baking more biscuits and cookies. Some recipes can be so quick and easy, with an end result that is far superior to shop-bought. I made the Wholemeal Shortbread Biscuits from Rachel Allen’s Favourite Food at Home; these golden biscuits are not too sweet or too savoury and full of wholesome goodness. If you love digestives, these are like a lighter version and simply delicious!

Tea and biscuit anyone?

Wholemeal Shortbread Biscuits

Makes about 20

Ingredients
75g/3oz wholemeal flour
75g/3oz plain flour
100g/4oz butter, softened
50g/2oz caster sugar

Preheat the oven to 180oC/160oC fan oven/350oF/Gas mark 4. Place all the ingredients in a food processor and whiz until the mixture almost comes together and resembles coarse breadcrumbs. Then tip onto the work surface and bring it together with your hands. If you are not using a food processor, rub the butter into the combined flour and sugar in a bowl and bring together with your hands.

Sprinkle your work surface with a little flour (brown or white) and roll out the dough until it is about 5mm/ ¼in thick. Using a biscuit cutter, cut into whatever shapes you like. Transfer onto a baking tray (no need to grease or line) and bake in the oven for 6-10 minutes depending on the size, or until they are pale golden and feel firm on top. Remove carefully and cool on a wire rack.

The Adorable Blog Award!


I’ve received many wonderful blog awards from friends and followers since I began blogging and it’s always such a great feeling. This is why I decided to start my own award and pass it on. When I started blogging I didn’t realize how many friends I’d make and how much fun I would have along the way. I visit many adorable and cute blogs that are filled with bright colours, innovative and inspiring pictures and best of all absolutely delicious food, which inspire me daily! I would like to thank all of you who visit my blog and leave such encouraging comments. Passing on this award is my thanks to you and your friendship. Please pass the award on, you will find the rules below.

I’m passing this award on to:

Beth @ Jam and Clotted Cream
Maria @ Two Peas and their Pod
Happy Cook @ My Kitchen Treasures
Rosie @ Baking Cakes Galore
Reeni @ Cinnamon Spice and Everything Nice
Erica @ Oh My! Apple Pie!
Anne @ Anne's Kitchen
Dani @ Sweet Treats
Angela @ A Spoonful of Sugar
Natalia @ Gatti Fili e Farina
Antonia @ Food Glorious Food
Margaret @ Kitchen Delights
Ivy @ Kopiaste..to Greek Hospitality
Nic @ Cherrapeno
Kelly @ Cooking the Books
Heather @ Sherry Trifle and Cats
Airy Fairy @ Airy Fairy Cupcakes

If there is anyone I have missed, I apologise and please except this award and pass it on!


Include the award logo in your blog or post.
Nominate as many blogs which show adorability, cuteness and charm.
Be sure to link to your nominees within your post.
Let them know that they have received this award by commenting on their blog.
Share the love and link to this post and to the person from whom you received your award.

Monday, 2 March 2009

Toffee, Apple and Almond Crumble

If there is one thing I love about weekends, it’s the opportunity to entertain friends or family at our home. This weekend we had my lovely mother in law over on Sunday for the day, she arrived just after 1pm, which gave me plenty of time for preparations. I got up early and prepared a chicken and mushroom bake in the slow cooker and then got started on what I can only describe as the most divine crumble ever! I had come across this recipe ages ago in my copy of Rachel Allen’s Favourite Food at Home but I’d never got round to making it, that is until Beth at Jam and Clotted Cream blogged about it recently and I was sold! The combination of toffee, apples and almond in this crumble transforms this favourite comfort pudding into something really special. This crumble was served with vanilla ice cream and extra toffee sauce and was a big hit all round! I loved this so much I did a Nigella and helped myself to seconds later on in the evening to eat while watching Lost, pure bliss!

Toffee, Apple and Almond Crumble

Ingredients:
Toffee Sauce:
125g Golden Syrup
125g Light Brown Sugar
50g Butter
100ml Single Cream
1 tsp Vanilla Extract

Crumble:
175g Self Raising Flour
Zest 1 Lemon
85g Butter, cubed
85g Light Brown Sugar
50g Ground Almonds

Filling:
6 Eating Apples, cored, peeled, quartered and cut into 2cm/¾in chunks
25g Butter

Method:
Preheat the oven 180oC/350oF/Gas Mark 4. Put all ingredients for the toffee sauce into saucepan over a medium heat and boil for 3 minutes, stirring until smooth. Set aside. Make the crumble topping by placing flour and lemon zest in a bowl and rub in butter, leaving it a little rough and uneven. Stir in the sugar and ground almonds to the crumble and place in the fridge until you are ready to use it. To make the filling, melt the butter in a saucepan or frying pan, add the chopped apples and toss on the heat for a few minutes until the apples start to soften. Add 125ml of the toffee sauce (about half; keep the rest for serving) and continue to simmer for a few minutes longer until the apples are just cooked. Pour the apple mixture in a pie dish and sprinkle over crumble and bake in the preheated oven for 20-40 minutes or until the crumble is light golden and with toffee sauce juices bubbling up the sides. Serve warm with vanilla ice cream and a jug of the remaining warm toffee sauce!

Sunday, 1 March 2009

Cherry Bakewell Cake ~ Sweet and Simple Bake!


It’s that time again for our monthly round-up at Sweet and Simple Bakes, this month Rosie chose this Cherry Bakewell Cake. It just so happens that Cherry Bakewell has been a life-long favourite of my hubby’s and yes he couldn’t wait for me to make it! The classic combination has this cake bursting with almond flavour, sandwiched together with the luxurious dark morello cherry conserve and topped with a blanket of silky white icing adorned with toasted flaked almonds and natural glace cherry halves. If you know someone who adores Bakewell Tart or slices, then they will love this cake and you! Please pop over to Sweet and Simple Bakes to view more delicious entries.


If you would like to re-create this delicious cake, you can find the recipe here!

Wednesday, 25 February 2009

Mincemeat Wedges

I’m sure there are many of us with jars of left over mincemeat at the back of the cupboard begging to be used and incorporated into something scrummy. My hubby loves anything with mincemeat and as I was browsing some of my cookbooks this week I came across this great recipe in The Cookie and Biscuit Bible for Mincemeat Wedges. These wedges are certainly a fantastic way of using up your home-made mincemeat left over from Christmas, while your kitchen is filled with that festive scent once again. The recipe is so simple and quick to make and the wholemeal flour used adds a nutty flavour that combines well with the mincemeat. These rustic looking wedges would be perfect accompanied with a steaming mug of hot tea, sat by a blazing open fire.

Mincemeat Wedges

Makes 12

Ingredients
225g/8oz/2 cups self-raising wholemeal flour
75g/3oz/6 tbsp unsalted butter, diced
75g/3oz/⅓ Demerara sugar
1 egg, beaten
115g/4oz/ ⅓ cup good quality mincemeat
60ml/4 tbsp milk
crushed brown or white sugar cubes or a mixture, for sprinkling

Preheat the oven to 200oC/400oF/Gas 6. Line the base of a 20cm/8in round sandwich tin and lightly grease the sides. Put the flour in a bowl, add the diced butter and rub in with your fingertips just until the mixture resembles coarse breadcrumbs.

Stir in the Demerara sugar, egg and mincemeat. Add enough milk to mix to a soft dough. Spread evenly in the prepared tin and sprinkle generously with the crushed sugar. Bake for about 20 minutes until firm and golden. Cool in the tin, then cut into wedges to serve.

Ollie has a purrfect life!!

Thursday, 19 February 2009

Carrot and Pecan Square Cake with Cream Cheese Icing

Its half-term this week in the UK, which means kids are at home and no doubt doing their parents heads in. Thankfully my son is 16 and likes to spend his time at the top of the house in his loft room playing Xbox live, PS3 or out with his friends, so it’s not too hard on me these days! Tomorrow we are driving down to Dorset to visit with my sister and her kids and spend the day. I don’t get to see them as often as I’d like because we live over 100 miles from each other, therefore I’m really looking forward to it. Especially seeing my baby niece Leyla whose 7 months and just adorable!! I’ve baked a Carrot and Pecan Square Cake to bring, that’s the thing when you’re a baker, you can’t ever visit family without bringing the bakes! The recipe is yet another great one from Rachel Allen’s Bake and one I couldn’t wait to try. I’m a big fan of Carrot Cake, so this cake was a must try. It’s very similar to a carrot cake with the difference being that it's denser, and richer and uses wholemeal flour. The end result is a gorgeous moist sweet sponge with flecks of carrot and studed with raisins throughout, with the added crunch of pecans. Finished off with the classic luscious cream cheese icing and a sprinkling of pecans!

Carrot and Pecan Square Cake with Cream Cheese Icing

Makes 12 to 16 squares

Cake
175g wholemeal self-raising flour
¼ teaspoon salt
3 tsp baking powder
1 teaspoon mixed spice
1 teaspoon ground ginger
50g raisins (optional)
150ml sunflower oil
150g soft light brown sugar
3 eggs
1 teaspoon vanilla extract
225g finely grated carrots
50g chopped pecans, plus 25g for sprinkling

Cream Cheese Icing
25g butter, softened
75g cream cheese, from the fridge
½ teaspoon vanilla extract
75g icing sugar, sifted

Preheat the oven to 180oC/350oF/Gas Mark 4. Butter the sides of an 8in/20cm square tin, and line the base with parchment paper.Sift the flour, salt, baking powder and spices into a large bowl. Add the raisins (if using) and mix well. Whisk the oil, brown sugar, eggs and vanilla, grated carrot and chopped pecans in a separate bowl, then mix in the flour and spice mixture. Spoon into the prepared tin and bake in the oven for 25 to 30 minutes, or until springy to the touch and a skewer, when inserted into the centre comes out clean. Allow to cool, then remove from the tin and place on a serving plate. Make the cream cheese icing: Beat the cream cheese, butter and vanilla together, then gradually add the icing sugar and beat until smooth. Then using a palette knife; spread the icing onto the cooled cake. Sprinkle with additional chopped pecans and cut into squares to serve.

Wednesday, 18 February 2009

Bitter Orange Loaf Cake

This lovely recipe is from the new Good Food 101 Teatime Treats, which I purchased last month on one of my famous amazon cookbook shopping sprees. The book is a collection of the very best recipes that are featured in the Good Food Magazine and follows on the success of 101 Cakes and Bakes. I was looking for a cake my boys would enjoy and love and came across this easy all-in-one cake. I adapted the recipe around my boys likes and I omitted the poppy seeds but I'm sure it would be great with the poppy seeds too. This zingy cake is so simple to make and using the yogurt gives the sponge a very moist and delicate texture. Orange lovers take note, this is definitely a must bake!

Bitter Orange Loaf Cake

Ingredients
3 tbsp good-quality thick marmalade (I used Frank Cooper's Thick Cut Oxford marmalade)
150g pot natural bio yogurt
3 eggs
175g golden caster sugar
200g self-raising flour
½ tsp baking powder
175g butter, softened
Zest 1 orange
2 tsp poppy seeds, toasted (I omitted the seeds)

For the Sticky topping:
Juice ½ orange
5 tbsp marmalade

Heat oven to 160C/fan 140C/gas 3. Butter a deep, medium-sized loaf tin (about 20 x 10cm, measured from the top), then line the base with a rectangle of non-stick baking paper. Put the marmalade into a small pan, heat gently until melted (or use a microwave proof jug or bowl, then cook on High for 30 secs). Beat in the yogurt, then let cool for a few mins.

Put the remaining cake ingredients into a large bowl and beat with an electric hand whisk until smooth. Quickly beat in the yogurt and marmalade mix, then pour into the prepared tin. It will be quite runny. Leave the mix mounded in the middle of the tin rather than levelling the top, to help it rise and crack in the middle.

Bake for 1 hr-1 hr 10 mins until golden and well-risen; a skewer should come out clean. Take a look at the cake after 45 mins; if it has taken on a lot of colour, loosely cover with baking paper. Meanwhile, heat the orange juice and marmalade in a small pan over a gentle heat until the marmalade melts (or use the microwave as before). Set aside to cool, stirring now and again, until you have a thick, but still runny, glaze. When the cake is ready, cool in the tin for 10 mins, then turn onto a rack. Spoon the topping over the cake while it's just warm. The cake is best served the day it's made, but will keep for up to 3 days tightly wrapped in an airtight container. Will freeze for up to 1 month, un-glazed.

A real afternoon teatime treat!

Saturday, 14 February 2009

Glitter Heart Cookies

Happy Valentine's Day!!

Valentines Day is a time for romance and love with chocolates and sweet treats normally at the centre of things but nothing can beat the love, passion and enjoyment that go into baking your own treats! My boys love cookies and what could be better than baking them a batch of these Glitter Heart Cookies to show them how much I love them! The original recipe for these cookies is the Gold Dust Cookies I made over Christmas, courtesy of Nigella Christmas. I loved the idea of using the recipe and turning them into Valentine themed cookies with heart shaped cookie cutters and pink glitter. If you’re looking for a simple but fun cookie recipe, try these delicious lovable cookies!
Glitter Heart Cookies

Makes about 30, depending on size

Ingredients
90g soft butter
100g caster sugar
1 large egg
1 teaspoon ground ginger (or vanilla extract)
200g plain flour, plus more for sprinkling
½ teaspoon baking powder
½ teaspoon fine salt
Edible pink dust or glitter flakes

Preheat the oven to 180oC/gas mark 4 and line a baking sheet or two with baking parchment or Bake-O-Glide.

Cream the butter and sugar together until whipped soft and pale, then beat in the egg, followed by the ginger (or vanilla), flour, baking powder and salt and continue mixing until it all comes together to make a soft dough.

Form into 2 discs, wrap each one in clingfilm and let it rest in the fridge for 20-30 minutes.

Sprinkle a suitable surface with flour, place a disc of dough on it and sprinkle a little more flour on top. Then roll out to a thickness of about 5mm.

Cut into shapes, dipping the cutter into flour as you go, and place the biscuits a little apart on the lined baking sheet/s. Keep the scraps of the first disc, to mix with the scraps of the second and roll and cut, re-roll and cut, until you’ve used up the mixture. This is wonderfully pliable dough, which makes it an unstressful joy to work with.

Bake in the oven for 18-12 minutes: this depends on their shape, how many sheets are in the oven at the same time, and whether on the upper or lower shelf, though you can swap them around after 5 minutes. When they’re ready, expect them to be tinged a pronounced pale gold around the edges; they’ll be softish still in the middle, but will harden on cooling.

Take the sheets out of the oven, remove the cookies, with a flat, preferably flexible, spatula to a wire rack and leave to cool.

Using a small (unused) paintbrush or eyeshadow brush, dip in the edible pink dust or glitter flakes, and give each cookies its gilded coating.

Friday, 13 February 2009

White Chocolate Love Heart Cupcakes with White Chocolate Cream Cheese Frosting

If ever there was a day for Love Heart Sweets, it’s definitely Valentines. These retro sweets have been around since I was a child; in fact production of them began in 1933 and was part of many a childhood romance. The messages on each sweet are all love related and over the years the messages have changed, I certainly don’t remember “Email me” or “Fax Me” as a child but then again most kids in the 70’s wouldn’t have had email or a fax machine!! So this week the idea came to me to find the perfect cupcake recipe and adorn each cupcake with a love heart and it wasn’t long before I came across this simply amazing recipe. These cupcakes have a lush white chocolate, milky, sweet flavour and the sponge is moist and fluffy. The cupcakes are then topped with this unbelievably delicious white chocolate cream cheese frosting, that you will love! Each cupcake is then topped with a love heart, which was my favourite part.


White Chocolate Love Heart Cupcakes with White Chocolate Cream Cheese Frosting

Makes 18 Cupcakes

White Chocolate Cupcakes:
1 ½ cups all purpose flour
1 tsp baking powder
½ tsp salt
1/3 cup butter, softened
¾ cup sugar
2 large eggs
4-oz white chocolate, chopped
1 tsp vanilla extract
1 cup plus 1 tbsp milk (low fat is fine)

Preheat oven to 160oC/fan 140oC/325F. Line muffin pans with 18 cupcake liners.In a medium bowl, whisk together flour, baking powder and salt. Set aside.In a small, microwave-safe bowl, melt the chopped white chocolate by heating it in 30 second intervals in the microwave. Stir well with a fork between each interval and cook only until the chocolate is smooth when stirred.In a large bowl, cream together butter and sugar until light. Beat in eggs one at a time, followed by melted white chocolate and vanilla extract. Working in two or three additions, alternate adding in some of the milk and some of the flour mixture, ending with a final addition of flour. Mix until just incorporated and no streaks of flour remain.Divide batter evenly into prepared muffin cups.Bake at 325F for 20-23 minutes until a tester comes out clean and the tops spring back when lightly pressed with a fingertip.Cool on a wire rack.

White Chocolate Cream Cheese Frosting:
4-oz cream cheese, room temperature
¼ cup butter, room temperature
1-oz white chocolate, melted and slightly cooled
1 tsp vanilla extract
3 tsp milk or cream
2-3 cups confectioners’ sugar
18 Love Heart Sweets

In a large mixing bowl, cream together cream cheese, butter and melted white chocolate. Beat in vanilla and milk, then add in the confectioners’ sugar gradually until the frosting reaches your desired consistency (make it a bit stiffer if you wish to pipe it onto the cupcakes instead of spreading it with a knife).Spread frosting onto cupcakes with a knife, or transfer to a pastry bag fitted with a wide tip and pipe onto cooled cupcakes. Top each cupcake with a Love Heart Sweet.

Wednesday, 11 February 2009

Don’t say it with words – say it with Love Custard Cupcakes!!

Valentine’s Day is almost upon us, and what better way to show that special someone in your life how much you love them, than to bake them a batch of romantic cupcakes, cookies or a heart shaped cake! I love Valentine’s, and part of the celebration I love the most is the baking, it’s where the enjoyable part begins for me and my love for pink, hearts, glitter and anything girly comes into its own. I started my Valentine baking fun today with a batch of Love Custard Cupcakes; these tasty bundles of love are deliciously moist and the buttercream frosting is luscious, all the right ingredients you need to let your loved one know what they mean to you. Plus...women and cakes? They’re a partnership made in heaven – he can’t go wrong.


Love Custard Cupcakes

Makes 12

Ingredients
100g custard powder
200g softened butter
2 eggs
4 tbsp milk
140g caster sugar
100g self-raising flour

To ice the cupcakes:
75g butter, softened
550g sifted icing sugar
2 tbsp custard powder
4 tablespoons milk
A drop of red food colouring
Hundreds and thousands, to decorate


Heat the oven to 180oC/fan 160oC/gas 4 and place 12 paper cases into a muffin tray. Beat the custard powder with the butter, eggs and milk, then stir in the sugar and fold in the sifted flour. Spoon into the paper cases. Bake for about 20 minutes until a skewer inserted into the centre comes out clean. Leave to cool completely.

In a bowl beat butter until fluffy. Gradually add the custard powder and the icing sugar, beating well.
Slowly beat in half of the milk and beat. Add a drop of red food colouring and beat. Beat in additional milk, if needed, to make a spreading consistency. Decorate each cupcake and finish with a sprinkling of hundreds and thousands

Monday, 9 February 2009

Cook Yourself Thin Quick and Easy~ Sweet Potato and Apple Soup and Banana Loaf

Over the recent last year I’ve piled on some weight, and after being in a rut for months (a first for me, as I’m generally very strong willed), I’ve now started to watch what I eat and cut back on calories. I will however still continue to bake delicious treats for my boys, family and friends but I’m going to be good and keep reminding myself how lonely my skinny jeans are sitting in my closet! Last month I purchased the new Cook Yourself Thin Quick and Easy cookbook and like the previous book it is packed with great recipes to help you shift the bulge with a few clever changes to the way you cook and the ingredients you use. Of course until today I had not tried any of the recipes from either of the Cook Yourself Thin books, so today I jumped in at the deep end and went for 2 recipes in one afternoon. I love soups and they are perfect for this cold weather we are experiencing, which is why I chose this Sweet Potato and Apple Soup as the first of my 2 recipes. I must say I’ve never had apple in a soup but it does add a different dimension to the flavour, making this is a delicious winter warmer and let’s not forget low in calories. My second choice of recipe had to be the Banana Loaf, after all I love baking and although I’m cutting down on calories, this low fat version will still allow me to enjoy a slice with my afternoon cup of tea. Who said dieting was boring?!


Sweet Potato and Apple Soup

Serves 4
143 calories per serving

Ingredients

1 tablespoon extra-virgin olive oil
1 onion, finely chopped
420g peeled sweet potatoes, diced into 1 ½ cm pieces
1 cm piece of ginger, peeled or ½ tsp ground ginger
1 tsp cumin seeds
1 tsp ground coriander
140g Bramley apples, peeled, cored and diced into 1.5cm pieces
Salt and freshly ground black pepper

Heat the oil in a pan, and gently fry the onion for 5 minutes until soft, but not browned. Add the sweet potato, ginger, cumin, coriander and apple. Cover with about 750ml boiling water. Bring to the boil, then turn down the heat and simmer with the lid on for 20 minutes until the sweet potato is tender. Whiz with a hand blender or in the food processor until the soup is smooth. Season to taste and serve.


Banana Loaf

Makes 14 slices
201 calories per slice


Ingredients
50g butter
175g light brown soft sugar
2 medium eggs, lightly beaten
350g peeled ripe bananas, mashed
200g self-raising flour sifted
½ tsp salt
½ tsp bicarbonate of soda
75g walnuts, roughly chopped (I used pecans, I was out of walnuts)
6 walnuts halves

Preheat the oven to 180oC/fan 160oC. Line and grease a 1kg loaf tin. Cream the butter with the sugar in a large mixing bowl until the mixture is light and fluffy. Add the beaten eggs, and gradually whisk them into the butter and sugar. Add the mashed bananas and beat the mixture well. Carefully fold in the flour, salt and bicarbonate of soda. Stir in the walnuts. Put the cake mixture into the prepared loaf tin and decorate with the walnut halves, pressing them gently into the mixture. Bake for 1 hour to 1 hour 15 minutes, until the cake has risen and us golden. Allow to cool.